
Camping can offer a wonderful escape into nature, but ensuring a proper setup for your tarp and tent is crucial for a comfortable experience. Mastering the art of pitching these essentials will not only enhance your outdoor adventure but also protect you from the elements. This guide will provide practical steps to help you set up your camping tarp and tent effectively.
1. Understanding Your Camping Tarp
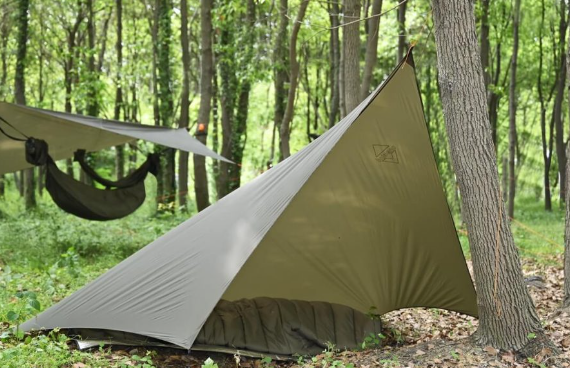
A camping tarp serves various purposes, such as providing extra rain protection, shade, or a clean space to gather around. Selecting the right tarp for your needs is critical. Look for materials that are waterproof and durable, like nylon or polyester, and consider factors such as size and weight depending on the type of camping you’ll be doing.
When choosing your tarp, think about the weather conditions you might encounter. If you expect rain, ensure your tarp is large enough to cover your tent and any gear. For sunny days, a lighter-colored tarp can help reflect heat while providing shade. Remember, a good tarp can also enhance your living space by creating a versatile outdoor area.
-
- Choose a tarp made from waterproof, durable material.
-
- Consider the size based on your tent and group size.
-
- Look for reflective or light-colored options for hot conditions.
-
- Ensure you have enough rope or cord for tying down your tarp.
2. Setting Up Your Tarp
Setting up your tarp involves finding the right location and properly securing it so it can withstand wind and rain. Start by identifying a flat area to pitch your tarp away from any potential hazards, like falling branches or flooding. Ideally, search for a location that provides natural windbreaks like trees or bushes.
Once you have a suitable spot, lay your tarp flat and stake it down at the corners, ensuring it’s taut enough to avoid sagging in rain. Use a “tent-style” pitch for moderate weather or an “A-frame” style for heavy rain. Consider incorporating guy lines to provide extra stability, tying them to sturdy trees or using stakes if no trees are available.
-
- Pick a flat, hazard-free area for setup.
-
- Stake down the corners of the tarp tightly.
-
- Opt for a pitched style appropriate for current weather conditions.
-
- Use guy lines for added stability.
3. Pitching Your Tent
After securing your tarp, it’s time to pitch your tent. Begin by unpacking your tent and laying it out on the chosen ground. Ensure that the tent floor is clean and free of sharp objects that could cause damage. If you have a footprint or tarp for your tent’s base, lay that down first for extra protection against moisture and abrasion.
When assembling the structure, follow the manufacturer’s instructions for your specific tent model. Most tents utilize a pole system that connects to a rainfly for added protection. Make sure to practice setting up your tent at home before heading out to become familiar with its mechanics and ensure you have all components. Remember to aerate your tent by keeping windows or vents open to avoid condensation buildup inside.
-
- Unpack and lay out your tent on clean ground.
-
- Use a footprint for extra base protection.
-
- Follow manufacturer instructions for assembly.
-
- Practice setup at home to become familiar with the process.
4. Final Checks and Safety Tips
Once your tarp and tent are set up, conducting a final check can ensure your campsite is safe and comfortable. Walk around the perimeter of your setup to identify any potential hazards, such as low branches, rocks, or uneven ground. Ensuring your tarp is securely anchored will help prevent it from becoming a sail in windy conditions.
Safety is paramount when camping. Keep your camping area tidy, and perhaps even establish a specific zone for cooking that’s away from your tent. Use candles or lanterns with caution and ensure there are no open flames near your sleeping area. Contingency plans for emergencies, such as having a first aid kit and knowing local emergency numbers, are wise preparations.
-
- Conduct a final safety check around your setup.
-
- Establish a designated cooking area away from your tent.
-
- Keep your tarp anchored securely to prevent accidents.
-
- Ensure you have a first aid kit and emergency contacts accessible.
In conclusion, understanding how to effectively set up your camping tarp and tent can greatly enhance your outdoor experience. With proper planning and techniques, you’ll be better equipped to enjoy the great outdoors while staying safe and comfortable. Gather your gear, head outdoors, and set up your campsite with confidence!